2023
Backpacking Gear List
My 2023 Backpacking Gear List Review
It’s that time of year again! Shoulder season is wrapping up and I’m pretty sure I’ve gone on my last overnight of the season which means it’s time for a backpacking gear review!
As always I want to start this out with the reminder that the gear you already have is almost always best (as long as it’s going to keep you safe) and I don’t want to encourage you to buy anything you don’t need. But if you’re in the market for anything, if your old gear is wearing out, you’re just starting out with your backpacking gear list setup, or if you’re just curious about what I carry —this backpacking gear review is for you!
I had quite a bit of gear that was ready to be replaced after the CDT last year, and while I still totally endorse the gear I carried on the CDT, it was time to change up a few things.
My focus this year has been trying to go smaller and lighter without sacrificing too much comfort, and you’ll see that reflected in a lot of my gear upgrades.
To give you an idea of what the gear has been through: I did multiple off trail routes this year, I did some desert hiking, and a lot of high alpine backpacking in Colorado. In total, I probably backpacked about 200 miles this year. That’s quite a bit lower than my mileage for 2022, but I think it’s still a good amount in varied enough conditions to form some solid opinions on gear.
Another quick side note: some of this gear WAS gifted to me by brands in exchange for work (social posts, photos, blogs, etc.) In all instances I reached out to them to see if they’d be willing to work with me in this way because I was already interested in that gear.
As an Amazon Associate, I earn from qualifying purchases. | Links on this page are affiliate links which means I earn a commission if you use them to purchase, at no cost to you. Thank you for your support!

THE BASICS
In recent years, I’ve found the term big three unnecessarily restricting, so I’m labeling this category “the basics”. It encompasses my pack, sleep system, and a few other things I always carry that don’t fit well in any of the other categories.
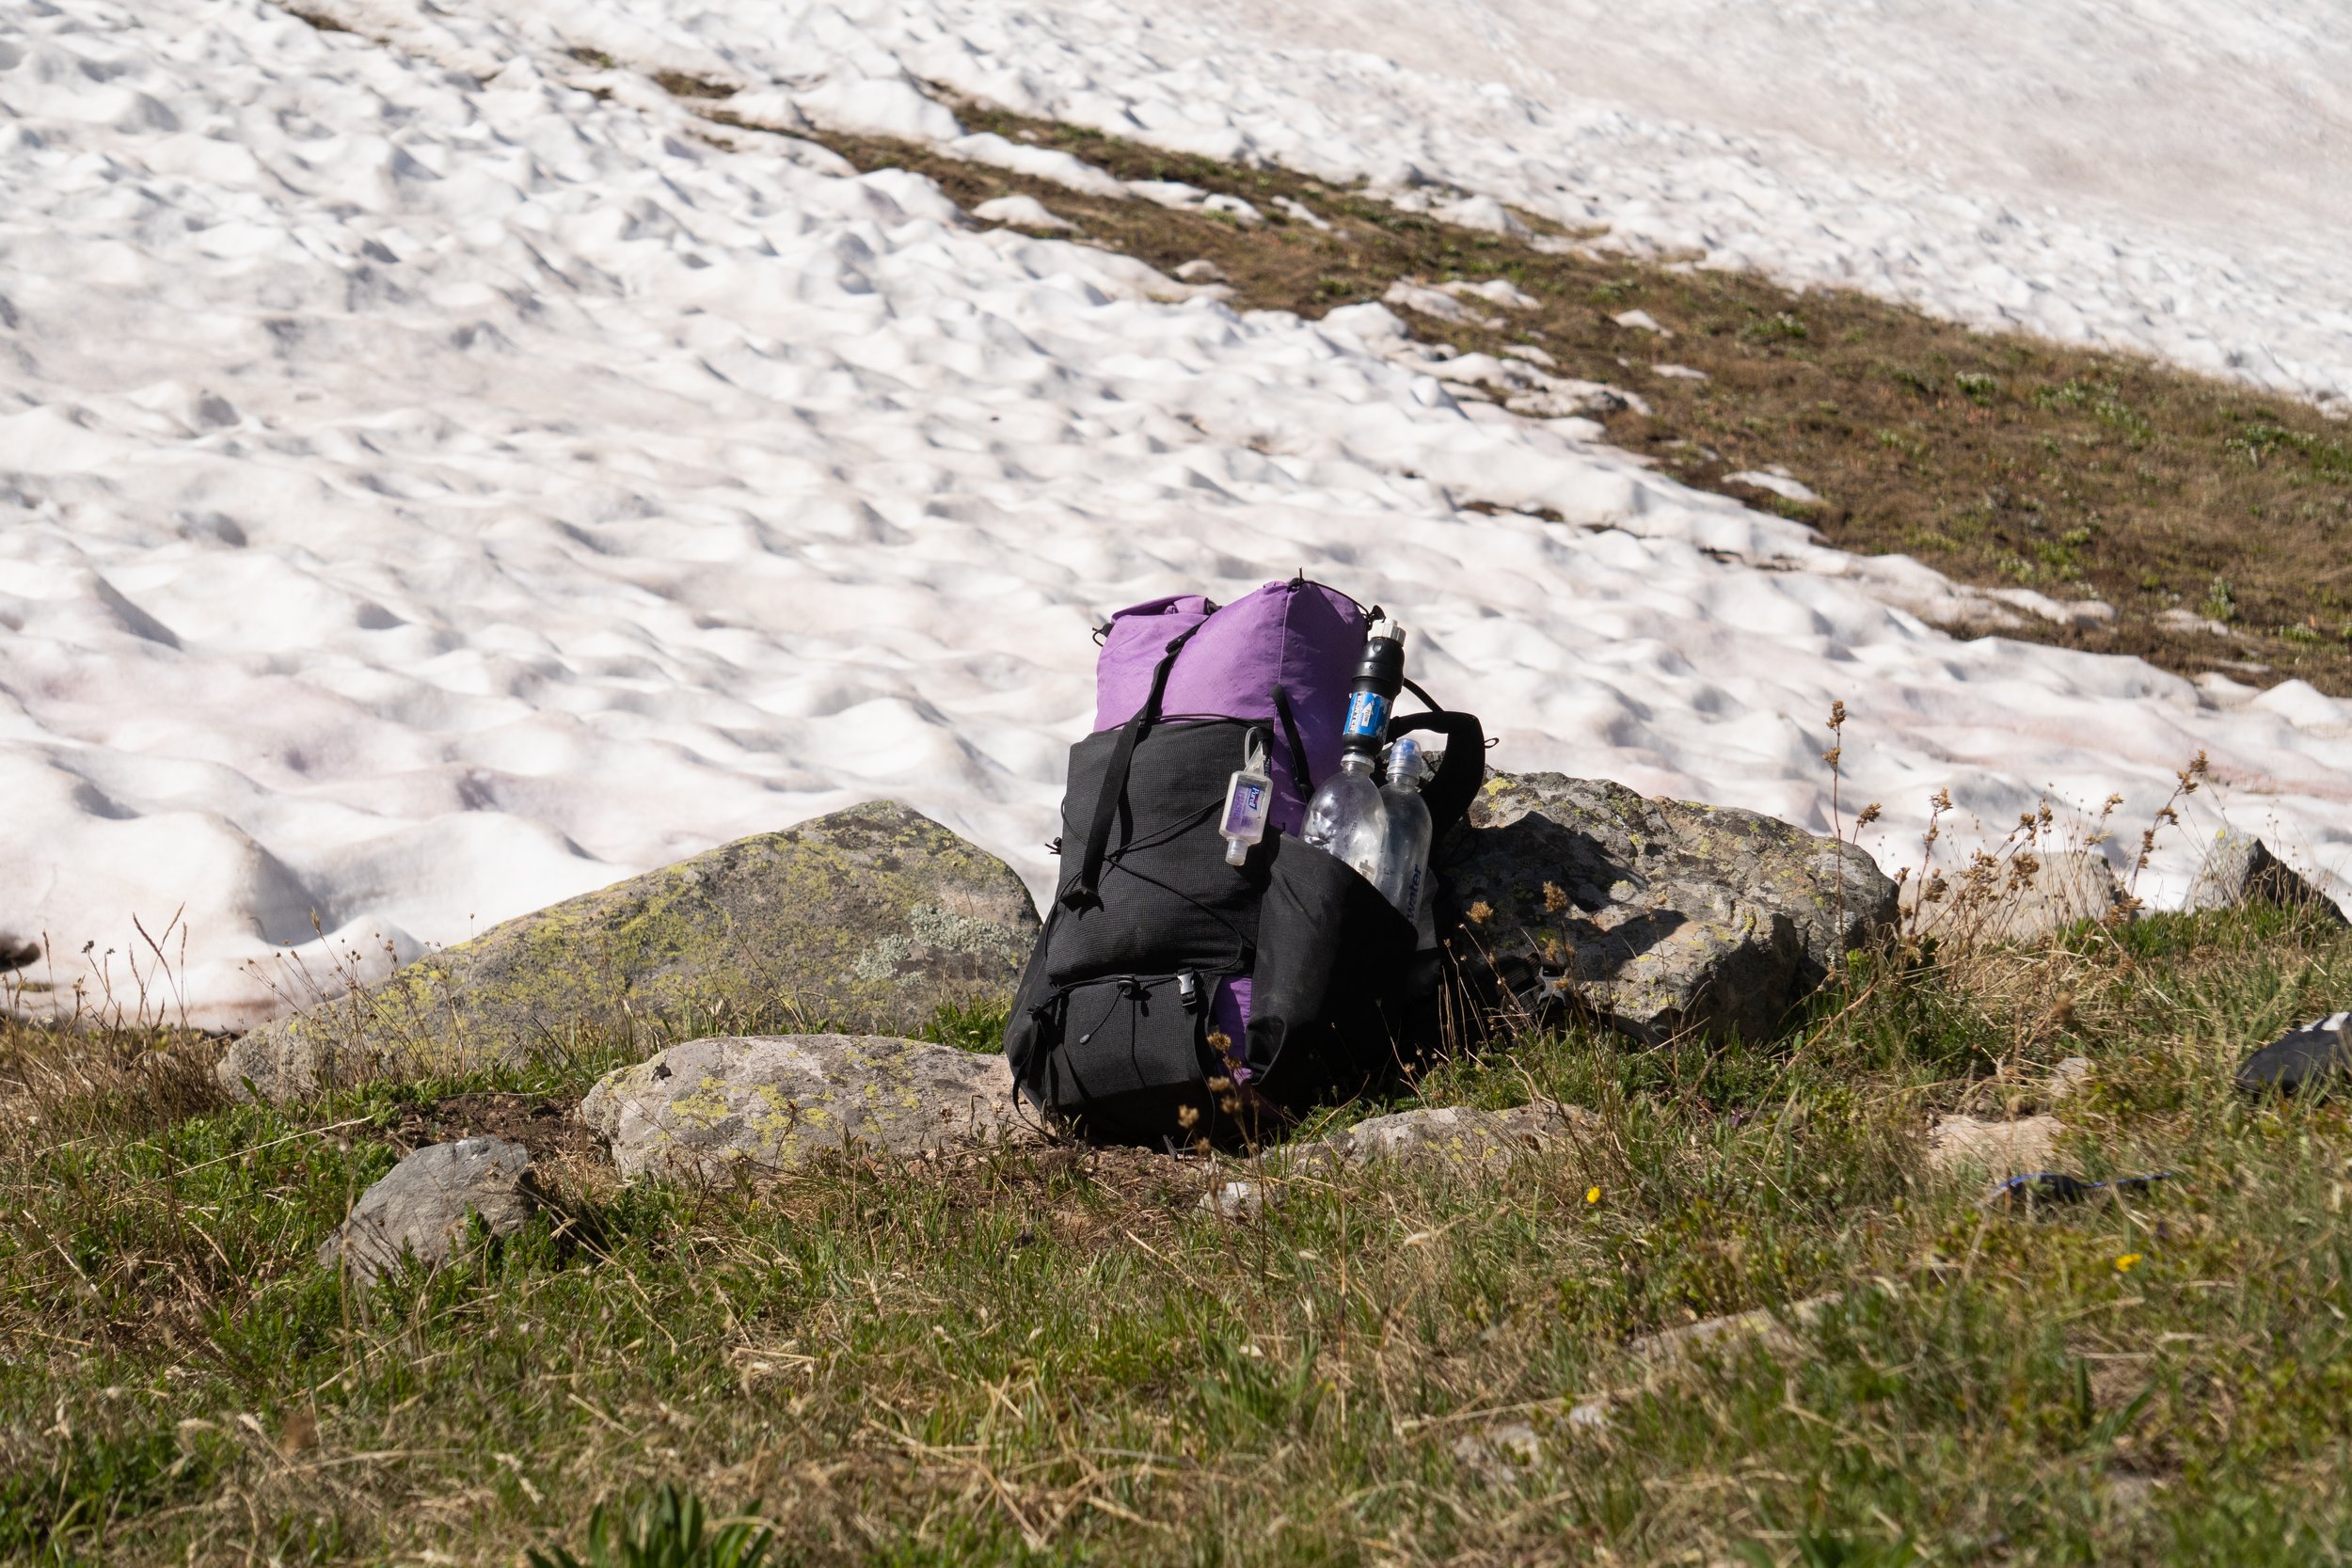
Pack: Neighborhood Packs Meadowlark | Use code SAUCEY10 for 10% off
17-20 oz. (depending on removables)
30L
EcoPack
On the CDT, I would dream of being what I like to call, a ‘tiny pack queen’ and the team at Neighborhood Packs has made my tiny purple pack dreams come true.
This pack is super sturdy, I can’t tell you how many rock walls I scraped this against on my various routes this summer and it still looks new. It carries comfortably and compresses all my gear really nicely for when I’m climbing up vertical faces in the Grand Canyon. It’s so helpful to have a pack that’s compact while scrambling.
It is frameless with a removable hip belt for the hardcore ULers. I was glad to have the hipbelt for trips with longer water carries, but started experimenting with removing it on my short over nights and have started to really enjoy the freedom of not having one.
As someone who is guilty of stuffing my mesh to the extreme, I really like how this mesh is more confining. It doesn’t have as much stretch as other meshes and it forces me to be a little more thoughtful about what I’m shoving in there.
I love that it has three different mesh pockets though, so I can still fit everything I need and organize it a little more intentionally than just one giant mesh pocket.
I especially am a fan of the bottom mesh pocket which I’ve always wanted on a pack. I use this for my trash so I can keep it separate from everything else.
This pack is also made of waterproof fabric and is seam taped which is awesome peace of mind for those Colorado afternoon rain and thunderstorms. I appreciate that I don’t have to use a pack cover with this if I don’t want to.
The only time I didn’t use this pack this summer was on the Pfiffner because obviously a 30L pack is kind of small, and I had to carry a bear proof container which takes up a lot of space.
Another thing that is super nice about this pack is the webbing on the shoulder straps that allows you to attach things. I especially love this for my peak design clip (it allows me to attach this above the foam so it doesn’t dig into my shoulder).
I also love supporting small, locally owned businesses and Neighborhood Packs is a family business based out of Colorado Springs. You can tell they really care about what they do and the quality of the gear they put out. They even gave me a code for 10% off if you are interested in getting one use the code: SAUCEY10 (I’ll put it in the description as well).
Obviously, this smaller pack is frameless so it does have limitations and isn’t for anyone with a heavier backpacking load. So keep in mind that if you have a higher base weight, this pack might not be for you (yet).

Quilt: Katabatic Sawatch 15 degree
26 oz.
15 degree
6ft, regular
850fp
expedry down
I’ve been eyeing a katabatic quilt for years and since it was past time to retire my Zpacks quilt I was very excited to make this upgrade this year.
If you have watched any of my other gear reviews or backpacking videos you have probably picked up on the fact that I get cold easily, so I went with the 15 degree option (the warmest that Katabatic offers) and have been so happy with that decision. I also went with the Elite series since it has a permanently closed footbox, I just don’t think I’m ready for a quilt that opens up all the way yet (or if I ever will be).
The 15 degree is honestly potentially overkill as a summer bag, but I get cold so easily that it works really well for me and makes it a really versatile, shoulder season bag as well.
Some specific features of this quilt that I really love:
extra down in the footbox: my feet always seem to be the coldest part of me when I’m sleeping so the extra fill they put in the footbox is a GAME CHANGER for me.
pad attachment system: the pad attachment system works so well for keeping the quilt cozy and in place around you. I was honestly nervous about not being able to zip a quilt since that’s what I’m used to, but this attachment system truly keeps everything in place and keeps out the drafts when used properly. Just be sure to review how to use it before you take it out — the plastic clips are hard to attach at first and if I hadn’t watched the video I might have been afraid to break them.
phone pocket: there’s a phone pocket inside the quilt which I usually use for my water filter so it doesn’t freeze overnight, I didn’t realize how much I’d like having a designated place for it rather than it floating around loose in my sleeping bag but I really like this feature.
button collar: in addition to the straps that keep the quilt snug against my sleeping pad, there’s buttons on the collar of the quilt that keep it snug around my neck, it almost gives me the feel of having a mummy bag with how snug it is without the extra weight. And of course if you don’t want that you can just not button them.
light for the warmth: at 26 oz it’s a great weight for a truly warm down bag and it also compresses really well in my pack.
Katabatic is also a local (to me) Colorado company that has some awesome business practices so I love being able to support them.
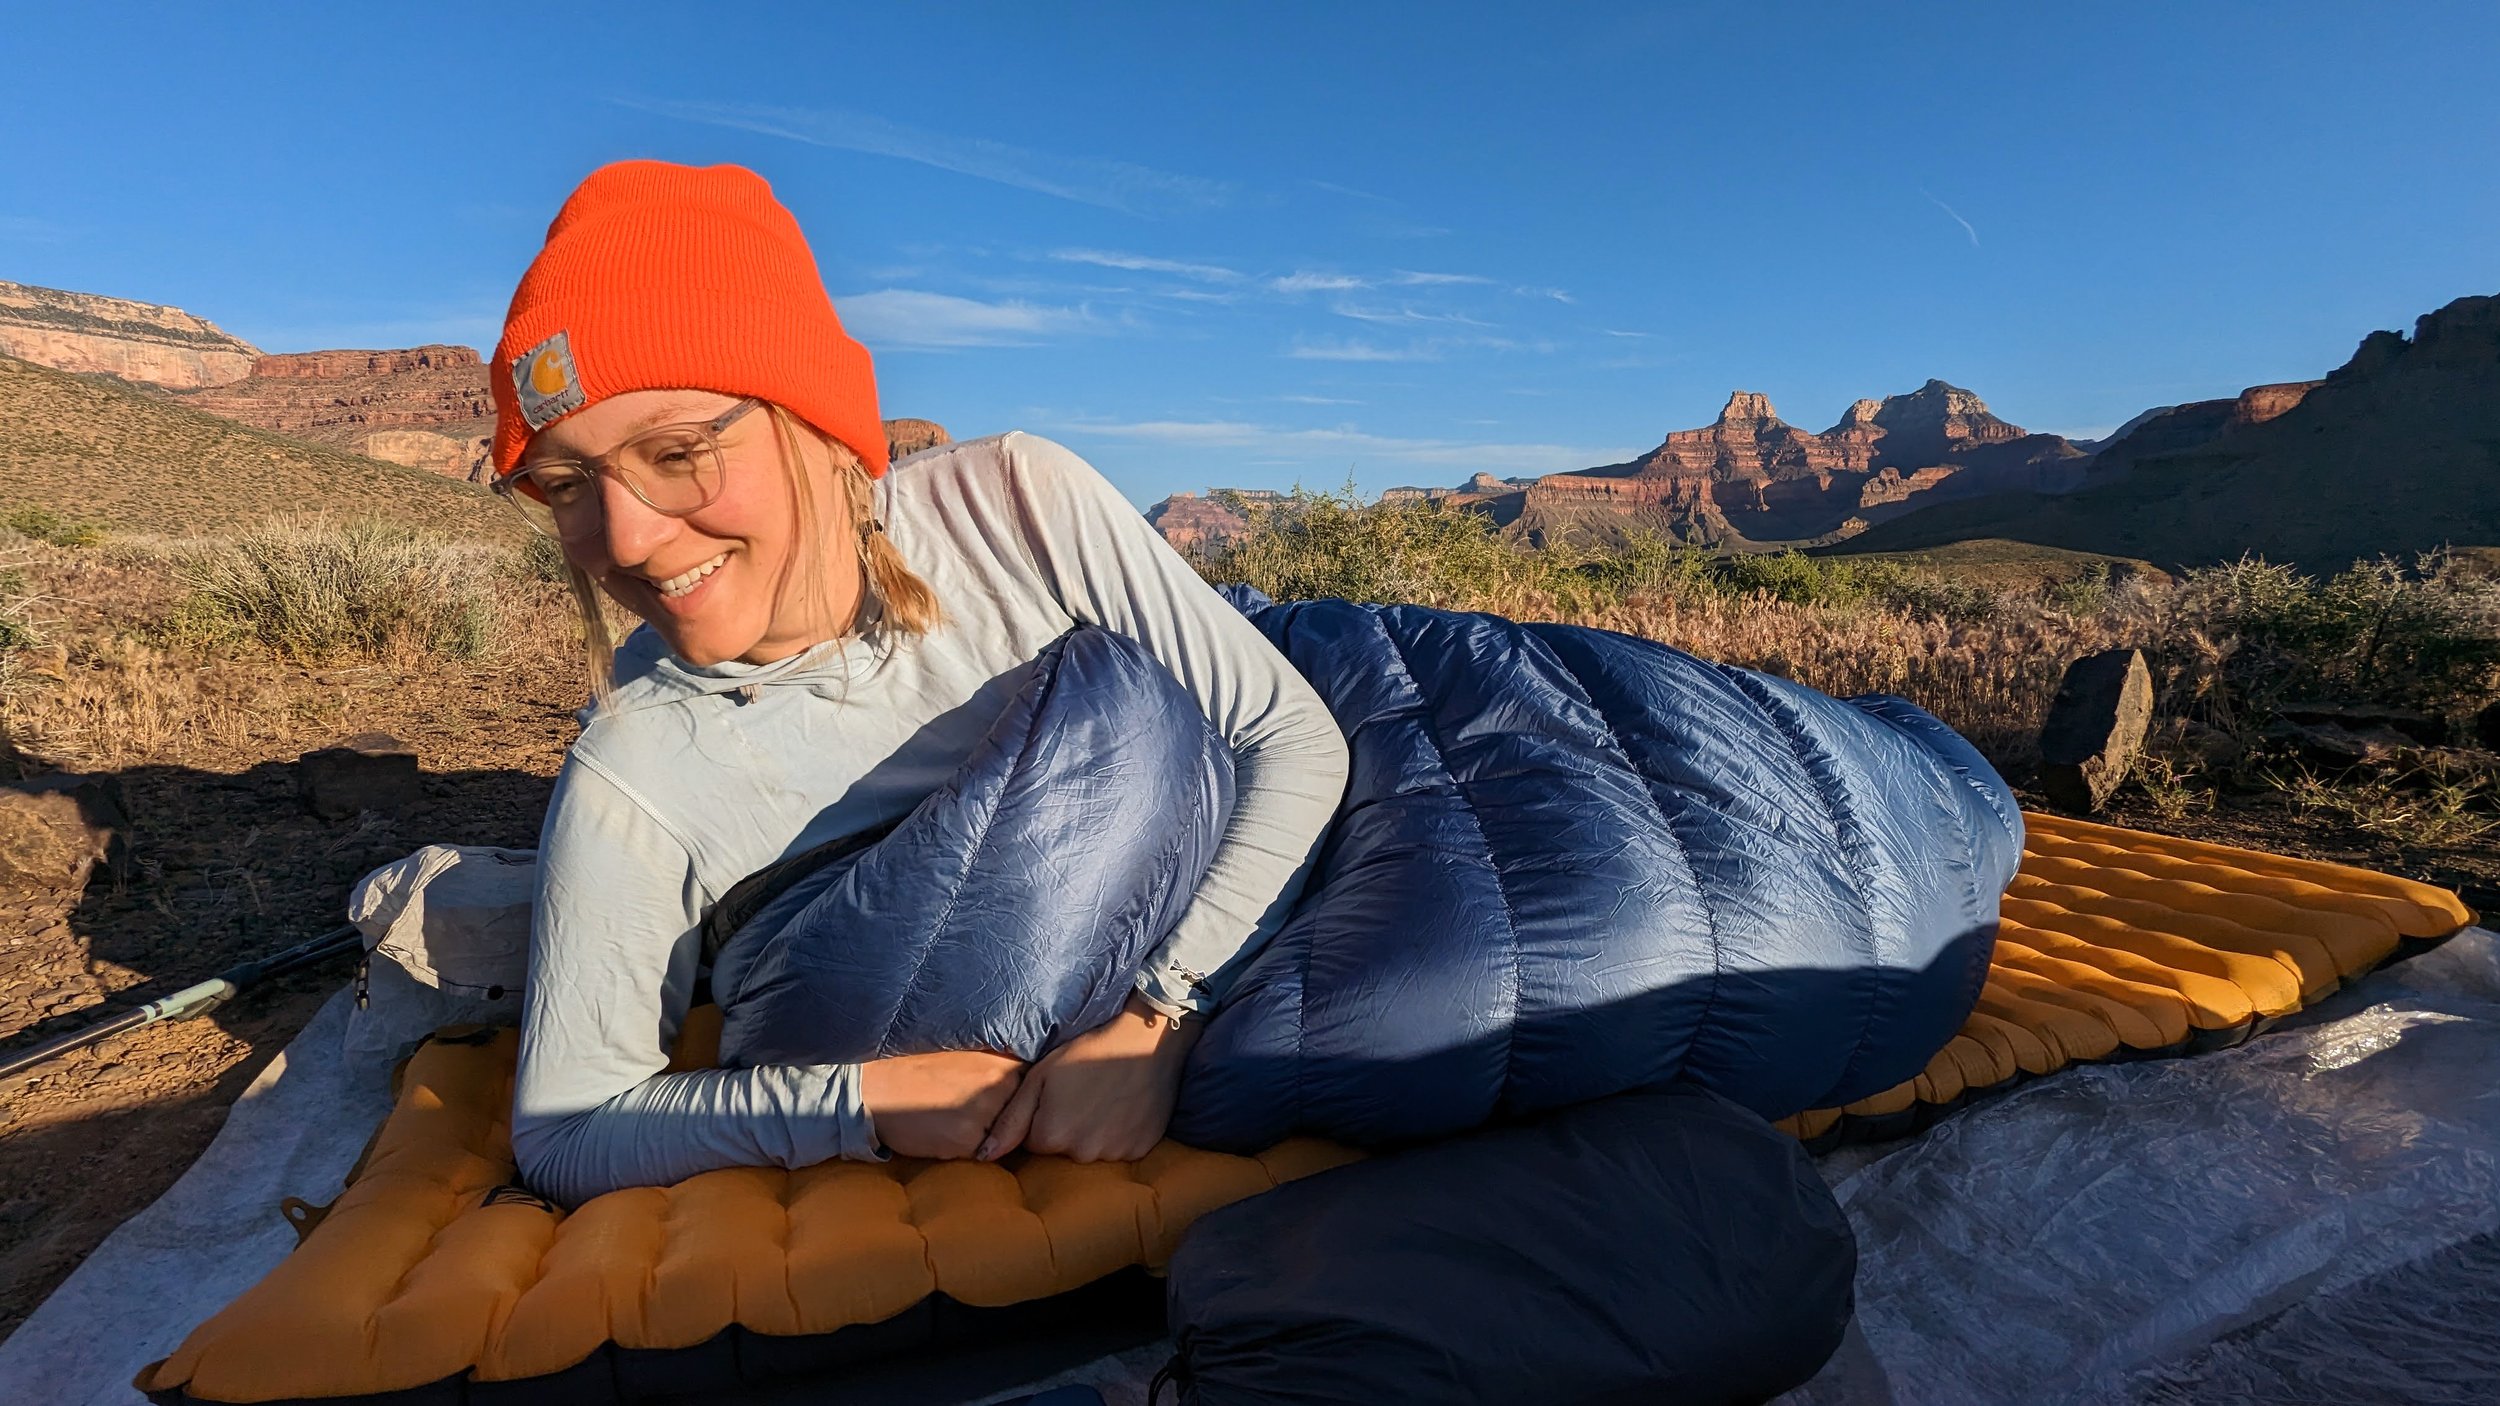
Sleeping Pad: Nemo Tensor Ultralight Insulated
16 oz.
Regular
I’ve officially given myself over to the full length inflatable sleeping pad life. I resisted for as long as I could, but I’m done torturing myself. Also, I think I’m honestly just getting older and the short pads and foam pads just aren’t cutting it anymore.
I considered a lot of different options for this, but ended up landing on the Nemo Tensor because Josh, aka kid, aka my fiance, used it on the CDT after going through several others and was very happy with it. I also borrowed his for awhile before making my own purchase, and I really liked it so figured I’d go with what I know.
It’s 15 oz. which is two ounces heavier than the therm-a-rest in the same size, but I was also able to get it for half the price (and I’ve seen it on sale quite a bit) so it was worth it to me.
It’s got an R-value of 4.2 which makes it great for using well into shoulder season and at high altitudes in the summer in Colorado.
The valve for blowing this up can be a little tricky the first few times you use it. It’s got a double layer to keep the air in as you’re blowing it up, but if you close the valve completely and decide to add more air later (after it’s been sitting in the cold for a bit), just be sure to hold down the bottom valve so you don’t accidentally let out a bunch of air at once.
I also always carry the inflation bag, after the sleeping pad I carried on the CDT started showing a bunch of mold growth that was enough to get me to carry the extra ounce to avoid moldy nastiness in the future and give this sleeping pad as long of a life as possible.
The biggest risk with inflatable pads is that they can pop, obviously, but I use a few different things to mitigate/ prepare for this which I’ll get into later.
I’m happy with it so far and will continue to use it next season!
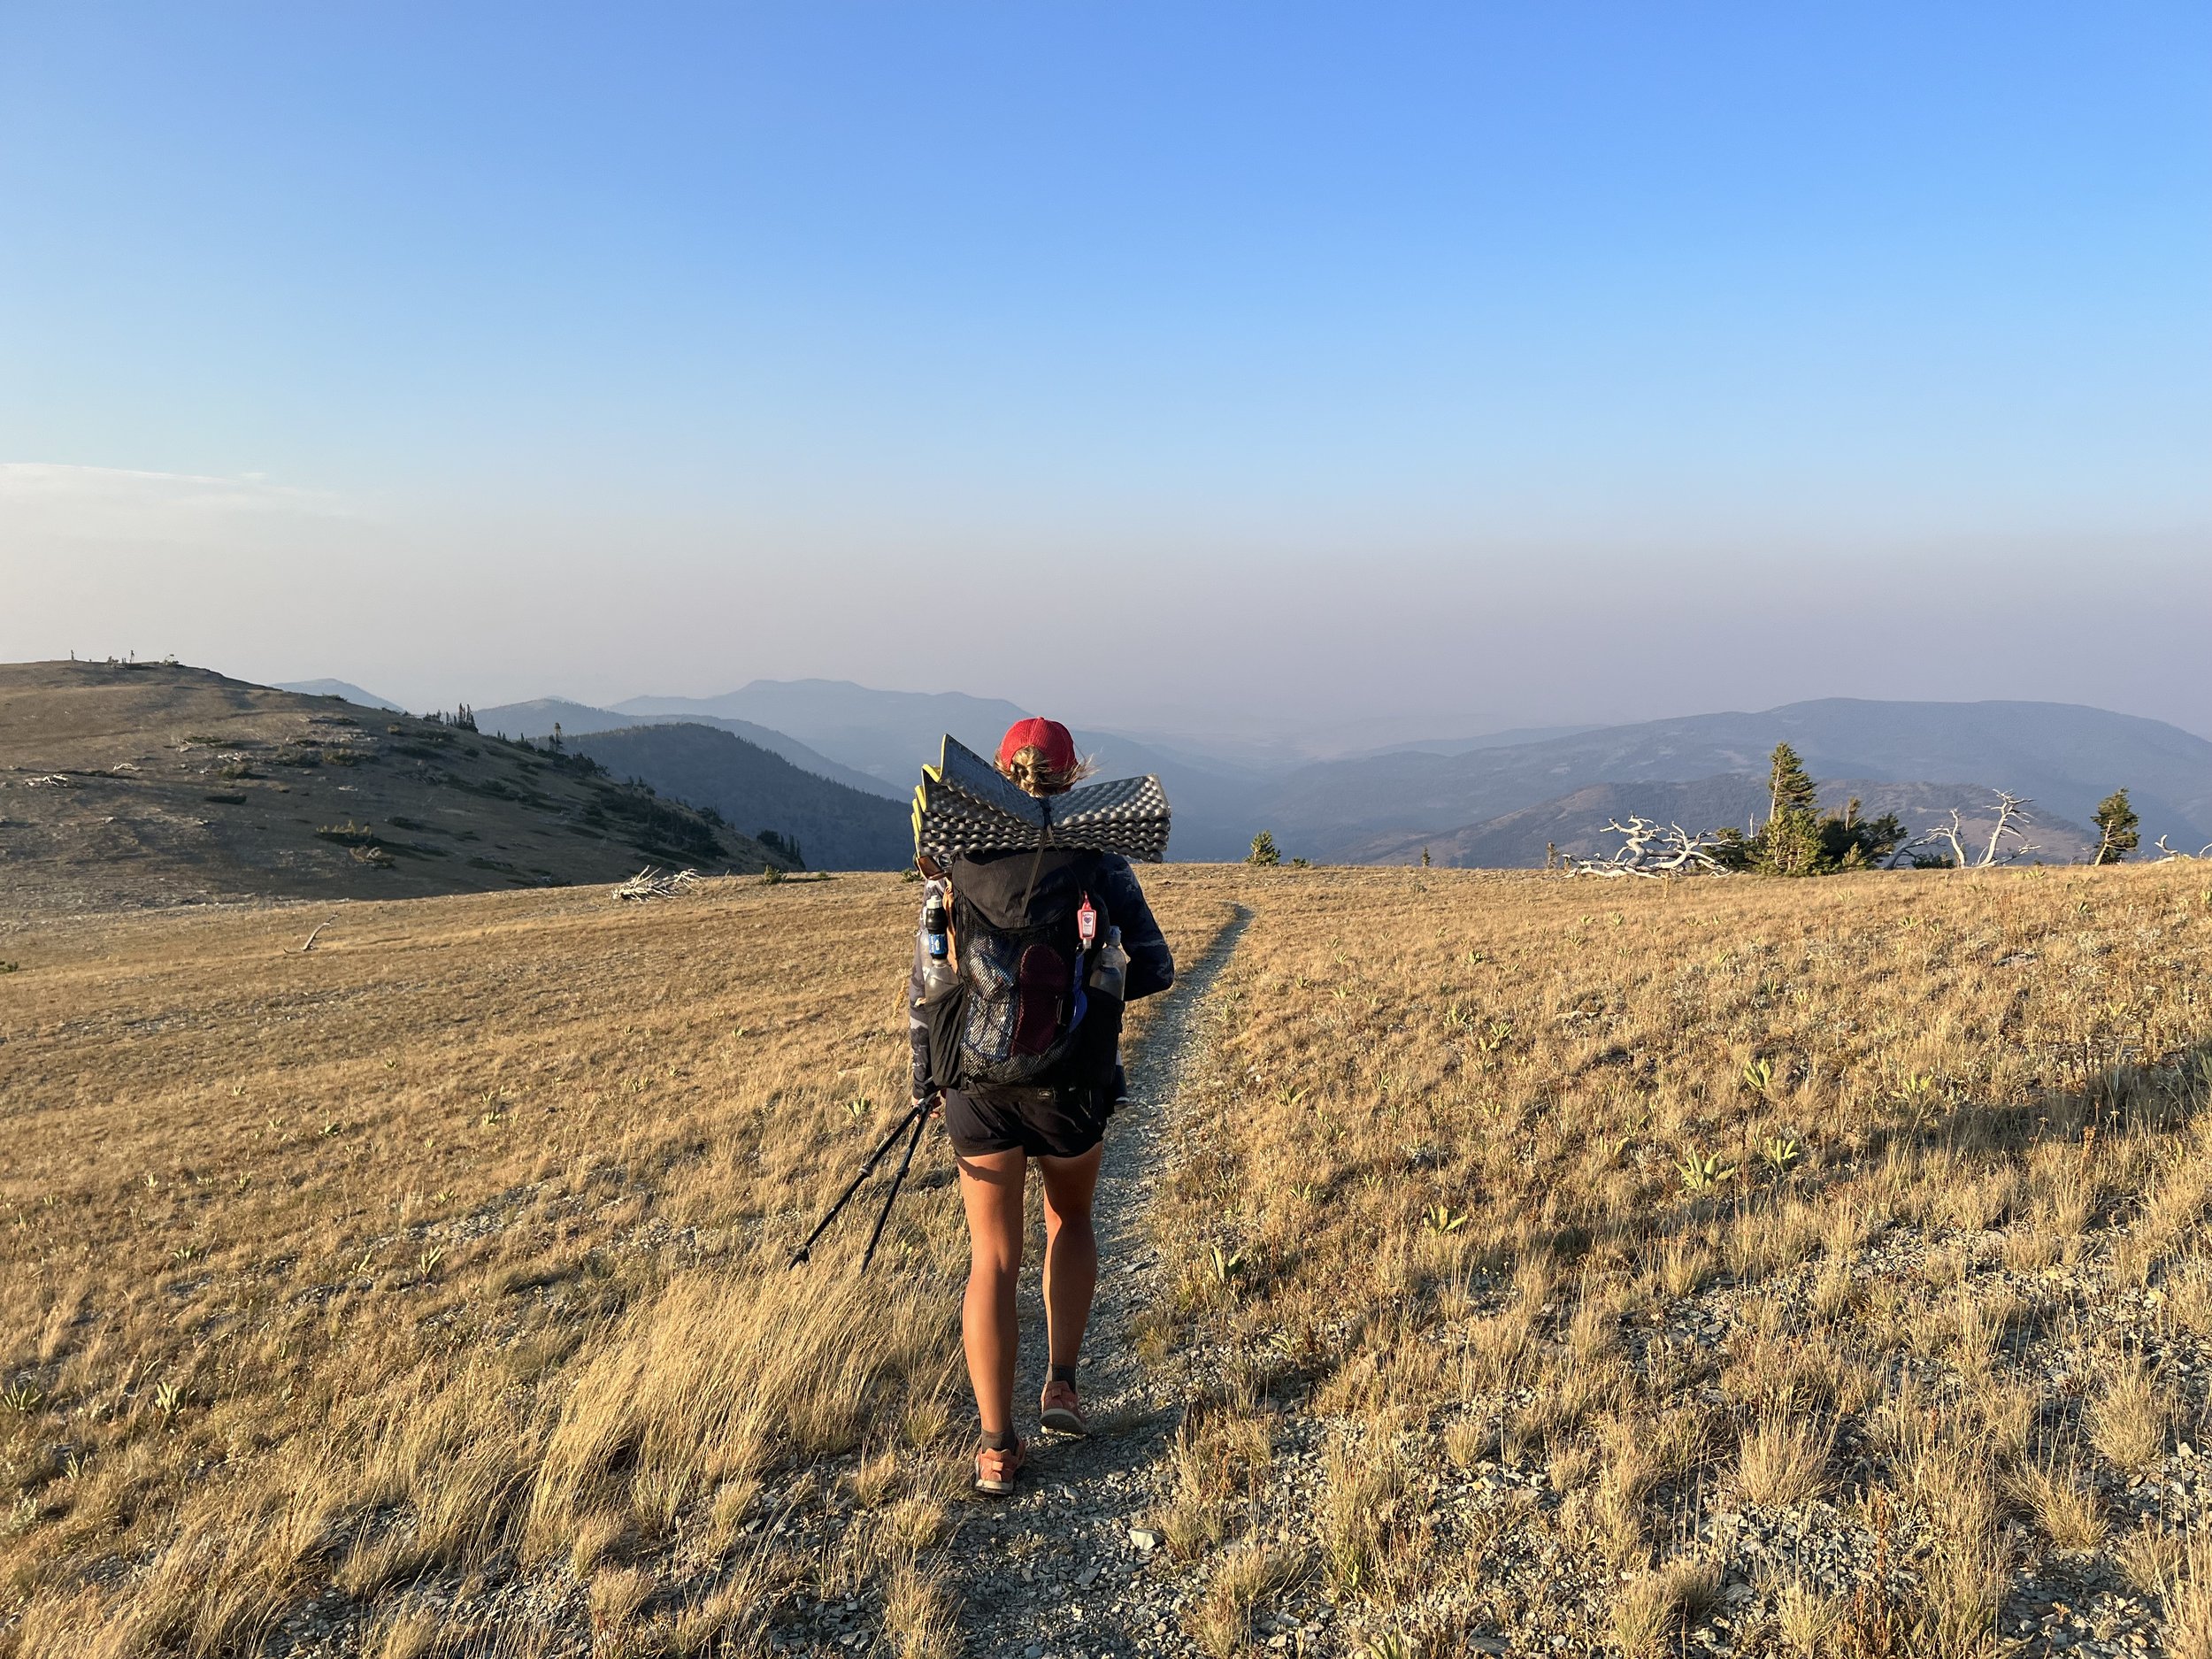
SIT/SLEEPING PAD: Gossamer Gear ThinLight foam pad
2.7 oz.
Rolled
While I did finally upgrade to sleeping on a blow up pad, I still wasn’t ready to give up my day time naps and lounges on a foam pad. But I also couldn’t keep justifying carrying an extra 10-12 oz. foam pad, enter the Gossamer Gear ThinLight foam pad. It’s just 2.7 oz. and perfectly fills the gap that my beloved foam pad left behind. It’s obviously a lot thinner than the thermarest foam pad, so you have to be a little more selective with where you lay on it, but that’s worth the weight savings to me. I also use it as another layer of protection (and insulaiton) under my blow up pad at night.
Just be sure to inspect that it hasn’t picked up anything poky during the day before you lay it down at night.

TENT: Durston Gear X-Mid Pro 1
16.4 oz (tent only)
19.2 oz (typical setup)
A Durston tent is another piece of gear I’ve been eyeing for awhile but couldn’t justify until my current tent had bit the dust. And after about 5,000 miles it was time to retire my duplex and try something new.
Obviously, I am still a fan of DCF tents. I think tents are one of the items where DCF really does make sense as a material and you can save SO much weight, which is why I went with the X-Mid Pro. The tent itself is 16.4 oz, but with the stuff sack and steaks it’s just over 19 oz.
To save weight, I also went with the 1 person version. While the duplex had a palatial amount of space for one person, I don’t feel like I’m sacrificing much by switching to the x-mid pro 1.
There’s still plenty of room inside for all my things and the vesitbules offer a ton of extra room as well for any gear you don’t want inside the tent with you.
One of the biggest complaints most people have about single wall tents is the condensation, which I think the X-Mid Pro has some great solves for.
Because of the unique design there’s quite a bit of space to sit up inside the tent and avoid touching the walls if they do get condensation. They also added little vents that prop open with velcro at the top corners of the tent, so even if you have both storm doors closed, you can still get some airflow with this design.
I also really like the higher up internal pockets on this tent and I use them a ton and did not realize what I was missing when I didn’t have them. I don’t think I could go back now.
Another sweet, thoughtful feature of this tent is the magnets that keep the vestibule doors open when you aren’t using them as well as little elastic ties that keep the mesh doors open if you need it.
The X-Mid is a little tricky to get the hang of pitching at first, so I highly recommend watching their videos and practicing at home before you take it out backpacking.
The footprint is also pretty large, so that can be a little tricky in some campsites if there’s not a lot of space, but once you get more used to pitching the tent, you can be more precise with positioning the floor which is obviously smaller than the full area of the tent.
There are tons of really great, thoughtful features on this tent that set it apart from other tents like it in the market and I’m excited to keep using it next year.

Trekking Poles: Black Diamond Alpine Carbon Cork
17.1 oz.
Next up as part of my backpacking essentials are my Black Diamond Alpine Carbon Cork Trekking Poles which I use to set up my tent and, of course, to hike with. These are another piece of gear that has been with me since the PCT and they have well over 5,000 miles on them since I use them for day hikes frequently as well. Obviously, they have been extremely durable. I’ve replaced the tips several times and that’s a great way to give your trekking poles a very long life. I also definitely think the cork handles are worth it over the foam handles, they just seem to be a lot more durable.
Ground Sheet: Tyvek
4.5 oz.
Small 84 x 36
After trying polycryo for awhile, I can’t justify how quickly it rips and I’ve converted to tyvek as my ground sheet.
The small size from six moon designs is actually a little wide and short for the foot print of the X-Mid Pro 1, so I trimmed the width and am okay with having a few inches of tent floor on the ground (I just avoid sleeping on that part if I can). But if you have an x-mid, you may want to get a custom size of tyvek from your local hardware store since it is a pretty long tent. OR you can get the Durston groundsheet.
We used the same Tyvek ground sheet for over 2,000 miles of the CDT and it’s still got some life in it, so in terms of durability, I’m a big fan.
If the noise of Tyvek bothers you, and you don’t want to wait to break it in, you can actually send it through the washing machine and that should help with the crinkly sound.

Fanny Pack: Thrupack Fanny Pack
4.7 oz.
with comfy strap
Next, is my thrupack fanny pack — the summit bum classic (with a comfy strap). This thing is super convenient and great to have when you want to drop your pack for a bathroom break or while you’re in town on hikes. It’s also waterproof which is great for when you need a place to stick electronics during a rainstorm. I like that it’s not too bulky and it’s still going strong after my CDT hike last year.
PACK LINER: Compactor Bags
18 gallon
I don’t use a rain cover because, as I mentioned, the meadowlark is made out of waterproof materials. But I always use a pack liner just for a little redundancy. I just use a trash compactor bag for a little extra peace of mind or if I ever end up having to swim at a water crossing (hopefully that does not happen). I like having the white ones because it’s easier to see your gear inside.
I’ve also heard of people putting this around their quilt on super cold nights and getting extra warmth that way, but just be careful of condensation if you try that.
CLOTHES:WORN & PACKED
I’m going to go over the clothes I regularly hike in as well as the ones I carry for sleeping and for rain or cold.
I’m a firm believer that you really don’t need much while backpacking so I hike in the same clothes every day and the only “extra” clothes I bring are my base layers to sleep in. Besides that I carry a few extra items for warmth and for rain.
A good rule of thumb for choosing backpacking clothes is really just wearing whatever you are already comfortable working out in or hiking in BUT keep in mind that you will likely have a lot of sun exposure so it’s not a bad idea to try for more coverage or UPF rated clothing to protect you from the sun.
Another quick side note about clothes:
If you tend to backpack where there are a lot of ticks (midwest or out east) or lots of mosquitoes (anywhere in mid-July), it’s really helpful to treat your clothes with Permethrin before you take them backpacking. You just spray it on whatever clothes you’ll be wearing or packing and it helps keep the mosquitoes and ticks away. You can even treat your gear with it, just be sure to follow the directions it comes with. I usually do this at the start of July every summer and by the time my clothes have gone through six washes (the amount you’re supposed to wait before retreating) the mosquitoes are usually gone.
Mountain Hardwear Crater Lake Long Sleeve Crop
First, I’m so obsessed with this Mountain Hardwear Crater Lake Long Sleeve Crop that I bought another one to wear this summer (since the one I wore on the CDT smells terrible now). It’s synthetic, like all synthetic layers, it will eventually start to smell, but I still think I prefer hiking in synthetic over merino. I also find synthetic fabrics to be a lot more durable than merino which tends to get holes from the backpack rubbing.
This particular top is super soft and stretchy and I also just love the cut and fit.
Baleaf Biker Shorts
Use code: ELISEO for 10% off
I wear several different pairs of shorts hiking and backpacking but when in doubt I always go for either my baleaf flyleaf 2-in-1’s that I wore on the CDT or these baleaf biker shorts. My main requirement for shorts is that they have a longer spandex layer to prevent chafing, and I also just find that more comfortable in general. I wore these shorts on the Pfiffner Traverse this summer and we were out for 7 days and I was really happy with how they held up. They didn’t stretch out or anything like that over the trip and were very comfortable to hike in.
My only complaint is that the biker shorts in particular can definitely hold onto water if they get submerged and aren’t super comfortable to hike in when wet.
Darn Tough Socks
2.3 oz (packed pair)
Micro Crew or 1/4 length
Cushioned, Midweight
If you’ve been here for a while this will come as no surprise, but I’m still rocking darn toughs and have no plans of stopping. I love the micro crew length for a little more protection around the ankles, although I also really like the look of the ¼ length socks. I usually make the choice between the lengths based on what kind of hike I’m going on. I always get the cushioned midweights and those hold up really well to a lot of mileage compared to the lightweight versions.
If you don’t know, Darn Tough has a warranty where you can get a new pair of socks if yours get a hole in them, and I’ve got 3 or 4 pairs from the PCT and CDT that I plan to use that on (I’ve been procrastinating).
Target Auden Underwear
1 oz. (packed pair)
The Target Auden Underwear is still the comfiest underwear I’ve found for hiking in. I love that it doesn’t have seams and is super stretchy, it’s basically like going commando without going commando. They aren’t technical at all but they work great for me.
Patagonia Barely Hipsters
1 oz. (swimming underwear)
The Target undies do tend to sag when they get wet though, and they don’t provide great coverage for my alpine lake dips. Because of this, I’ll also occasionally carry the Patagonia Barely Hipsters for swimming or as backups on particularly long stretches.
Patagonia Bra
I still sometimes wear the lululemon bra I wore on the PCT, but since I probably can’t wear that forever I’ve started to bring the Patagonia cross beta bra into the rotation as well. Honestly, whatever sports bra is most comfortable to you is what I would recommend wearing.

Hoka Speedgoat 5s
A big change on the footwear front for me this season has been switching to Hoka’s! I’ve been wearing the Hoka Speedgoat 5s and really loving them. I felt like I needed more cushion after the CDT and now that they make a wide version I felt like I could finally try them out. They are definitely not as big in the toe box as Altras so I’ve had a few adjustment blisters on the side of my big toe, but it didn’t cause any foot pain (and have definitely reduced my knee pain) so I’m sticking with them for now.
The tread on these are also great and I find myself trusting them fully on steep and loose terrain.
One concern I had about these was the stack height, I was worried I’d be more prone to rolled ankles just because there is SO much cushion. So far, it hasn’t been an issue and I feel secure walking in them.
Another thing that has been an adjustment switching to the Hoka’s is the thinner tongue. If I don’t get it adjusted well or if I tie my laces too tight I can definitely feel them more than in other shoes. The way I combat this is just taking a little more time to adjust the tongue and tie my shoes each morning.
Zenni Glasses/Sunglasses
Glasses 0.5 oz.
Sunglasses 0.9 oz.
Case w/cleaning cloth 1.8 oz.
Since I don’t wear contacts, I wear and carry prescription glasses and sunglasses on all my hikes. Zenni has been my go to for awhile now because it’s so affordable and all you have to do is plug your prescription in once and you’re good to order as many glasses as you need. The cases they come in are also a light, but sturdy plastic that I’ve found perfect for bringing backpacking.
Using Zenni also gives me some peace of mind that if I did break my glasses while hiking they wouldn’t be super expensive to replace.
Howler Brothers Arroyo Tech Strapback
I fell in love with the Howler Brothers Arroyo Tech Strapback hat when I found one at a gear shop in Steamboat on the CDT. The hat I bought on the CDT is nasty now so I ordered two more this past spring which I rotated through while backpacking this summer. I like the closure because it doesn’t get caught in my hair and is super easy to adjust and tighten when it gets super windy. I also like the material and the breathability and honestly just how the hats look (I don’t like how most hats look on me so honestly that’s a big factor).
I don’t know exactly what the bill is made out of but it doesn’t seem to wash well and that’s my biggest complaint for these hats considering they’re about $35. I’ve had success trying to just wash the inner band but it seems like you have to be careful otherwise it will warp.

PACKED CLOTHES
Base Layer Top: Patagonia Capilene Air Hoody
5.6 oz.
Base Layer Bottoms: Patagonia Capilene Air Bottoms
5.6 oz.
I switched up my base layers this year because I don’t love the fit of the merino wool bottoms I have (or they have holes in them) and my fiance had a patagonia discount code. The Capilene Air Hoody and Bottoms are working well for me. They’re stretchy and I like how they fit. I love that the top has a hood because I can fully bundle when I sleep. And I really love how high waisted the bottoms are. The 3D knit they use truly is warm but airy, so they’re also great as hiking layers in the winter or on cold mornings.
I do get a bit itchy sometimes in merino and even at only 51% I still get itchy in these sometimes. My only other complaint is that the knit is pretty see-through, so if you’re like me and prefer to sleep in JUST your base layers, you might be unintentionally putting on a show at camp, so just keep that in mind!
Puffy: Katabatic Tarn Down Jacket
8.6 oz.
Medium
Along with my new sleeping bag, I also got a new puffy from Katabatic this season. I got their Tarn Down Jacket. I love it for a lot of the same reasons I love my Sawatch quilt. It’s really comfy and has a very secure fit. I went with a medium because I wear medium in most things and I wanted a tighter fit, but if you want to layer more than one, thinner layer underneath I recommend sizing up. This is also more of a midweight puffy, so it’s a great shoulder season jacket or an extra layer in the winter, but if you want something even warmer they also offer their Tincup down jacket with more fill.
You can tell just by holding it that the Tarn is really well made and it’s definitely going to continue to be an essential layer for me.
Beanie: Carhartt
3.3 oz.
I never really switch it up in this category, just wear a beanie you find warm and comfy and bonus points if you also like how it looks.
Gloves: Seirus gloves or fleece gloves + scrambling gloves
Seirus Gloves 3 oz.
Fleece Gloves 2.5 oz.
Hyflex Gloves < 1 oz.
I tend to pack different gloves (or none at all) depending on the specific trip, but my go to since the PCT have been the serius polartec weatherproof gloves for trips that I expect will be quite chilly. If I want to go lighter and only expect to wear gloves in the morning, I’ll usually go with a light, cheap pair of fleece gloves.
On the Pfiffner, Leslie brought some extra work gloves she got on a Skurka canyoneering trip to wear while scrambling and I loved having these as a layer between my hands and the cold/rough rock. They’re also grippy which I imagine would be nice if it were slick but I haven’t tested them in those conditions.
Montbell Versalite Rain Jacket
6.4 oz.
Men’s
I stole Josh’s rain jacket for this entire backpacking season under the guise that I would eventually buy my own, and I intend to do that this winter. I’ll be buying the same one I borrowed from him, the Montbell versalite. It’s super light, a lot more durable than frogg toggs obviously, and it’s actually waterproof (unlike some jackets in a similar weight and price range on the market). I also used this a lot as a wind layer and it has pit zips which is great for when you start to work up a sweat but it’s still raining or super windy.
Frogg Togg Java Toad Rain Pants
12 oz.
small
I stuck with the Frog Togg Java Toad rain pants I picked up on the CDT as my bottom rain/wind layer. These are a lot more durable than the typical frogg toggs so they’re still holding up great and I think a great weight for the price. If you want to go a lot lighter on rain pants you’re going to spend several hundred more so I’m happy with roughly $60 and 12oz. These were essential not only for chilly mornings but also for the bushwacking sections of the Pfiffner Traverse.
Bug Head Net
1 oz.
This bug head net is one of the BEST pieces of gear I ever purchased and I try to NEVER leave without it. It’s super light, relatively cheap and has a permanent spot in my backpack because of the amount of times it’s allowed me to maintain my sanity while being absolutely swarmed by mosquitoes.

ELECTRONICS:
Battery Pack: Anker 20,000 mAH | 12.5 oz.
First up, the power that makes all the other electronics run!
My anker 20,000 mAH battery pack that I carried on the Pacific Crest Trail is still going strong, so I’ve been carrying that on all my trips this year as well. On some of my shorter trips I carried a 10,000 mAH instead, but since I carry so many things that I need to charge, I still love the peace of mind the 20,000 maH brings me.
It has two usb ports which I prefer to have one in case I need to charge two things overnight while I’m out.
If you’re trying to get a gauge on how much battery power you need, I charge my headlamp, video camera, phone, and camera on this and it has always been enough for 7+ days. I’ve run out of juice in the battery itself but still had plenty on my phone, etc. to get all the way into town. Obviously, if I know I’m going to be out for that long, I’ll be a little more careful with my battery usage but I’m really not monitoring it that closely and have always had enough.
This particular model doesn’t have fast charging or anything fancy like that. For one week or weekend trips I just charge it the night before, and I’m not the type to go in and out of towns that quickly on thru-hikes so I have not yet felt the need to upgrade to fast charging.
Garmin Instinct Solar Watch (worn) + band
I’m still rocking the same Garmin Insinct Solar watch with an elastic/nylon band that I wore on the Continental Divide Trail. I still really love using this to track my hikes and it’s nice getting that extra battery power from the sun. I usually have to charge it still after two days of tracking, but without using the tracking it can last weeks without a charge. And based on research/anecdotal evidence from other hikers, two full days of tracking is pretty good! I usually try to save battery by turning it off at night and if you want to be extra diligent, you can set it in direct sunlight when you take breaks, but I usually forget to do that.
A complaint I USED to have about this watch was that it sometimes would be inaccurate with the altitude reading, but I have since found out that’s just an issue with altimeters in general, and you can recalibrate the watch to get a more accurate reading.
The watch can store several weeks of workouts and you can upload them to your garmin connect app when you are in cell service. Lately, I’ve also been uploading them to strava which is great if you’re already an avid strava user.
Overall, I love this thing and I use it constantly. It also syncs with other garmin devices but I don’t really use that feature.
Headlamp: Nitecore nu25 | 1 oz.
My Nitecore headlamp from the PCT is ALSO still going strong. I can’t recommend this headlamp enough, it’s super bright, super light and obviously, super durable. I don’t plan to replace this until it dies. At 1 oz and for how bright this is, you really can’t beat it.
Garmin InReach Mini | 3.5 oz. OR Zoleo | 5.3 oz.
I carried a Garmin InReach Mini on all my hikes this year as well. Personally, I have no reason to upgrade to the mini 2 and I’ll continue to carry this probably until our cell phones get to a point where separate satellite communication devices become redundant. This was especially helpful for checking the weather at certain waypoints on the Pfiffner Traverse, for example our last day of the traverse we went over 5, 13,000 ft peaks and I was able to check the weather on our last peak the night before and saw that there was a chance of rain there around noon (despite the forecast from our campsite being clear for the next day).
If you don’t want to spend as much, and are okay with a little more weight, I think the zoleo satellite communicator is a great alternative. (3.5 oz vs. 5.3).
I also bought my inreach mini refurbished which is another great option if you want to save a little bit of money.
Keep in mind that most satellite communicators do have an activation fee, for the Garmin it’s $35/year. And then on top of that the cheapest subscription plan (so that you can actually use the device to send messages and get the weather, etc.) is $15/month. I always just get the cheapest plan because it comes with unlimited preset messages and 10 text messages. I always set up a preset message that goes to a set list of people that basically says, “hey I’m safe” and includes my location. I only really use the additional 10 text messages to check the weather or occasionally send specific updates or questions. That really came in hand on the CDT asking my dad to check for fires on trail and things like that. Even if you go over the 10 texts, it’s only $.50/text so unless you send something like 40 extra texts it’s not worth upgrading to the $35 plan.
If you are someone who is getting this to text a partner at home on a regular basis, then you may want to go with the more expensive plan, but keep in mind the messages can sometimes send sporadically, so be sure to communicate that with folks at home so they don’t panic.
Also, remember that any time you’re in a canyon, satellite devices can be unreliable because of the canyon walls and the pattern of the satellites.
Phone Case: Otterbox Commuter | 2.39 oz.
I always keep an Otterbox case on my phone, but especially while hiking. I’ve put my phone in my pocket and been scrambling over rocks bending up and down, etc. and it’s fallen out. But my phone is still fine thanks to this case.
Tempered Glass protector | .2 oz.
Tempered glass screen protectors are another must for me. They’ve saved my phone screen more than a few times. They’re super easy to replace if they get cracked too.
Wall Charger | 3.5 oz.
I got this 4 port wall charger so I could carry as little as possible while being able to charge as much as possible in town while on the Continental Divide Trail. I still use this at home to charge all my stuff, especially the night before a backpacking trip to get my headlamp, camera, etc. juiced up.
Apple Headphones | 0.8 oz.
Nothing special here, I just use apple headphones. Maybe one day I’ll go back to wireless headphones but I really don’t want to have to worry about charging anything else.

CAMERA GEAR:
Moving on to my camera gear!! This is the stuff I carry with me to document my adventures and this setup has been working really well for me so far. I’m no professional, but if you like my content it’s all been made using these items.
DJI Osmo Pocket 2 | 4.1 oz.
If you really want to get started with taking videos of hiking or backpacking and you don’t know where to start or can only get one thing on this list, let it be this camera. The DJI Pocket 2 is my favorite part of my camera setup and probably one of my favorite pieces out of all my backpacking gear. This little camera is super lightweight (just 4 oz.) and super versatile. It shoots in 4K, has customizable settings, and can connect to your phone for a larger viewfinder and control panel. To be honest, I usually just shoot with the camera itself and don’t usually bother connecting it to my phone because it’s quicker and I have to take my phone case off for it to plug in properly.
What I love so much about this is it’s super easy to just take out while you are walking and get a shot. It’s a mini gimbal camera which means it has a gimbal built in which stabilizes your shot so you can pretty easily hike and film.
I also like having something separate to film with than my phone because I feel like 1) it’s easier to manipulate the settings and have the final product look more professional. 2) it’s extra battery, if I was filming in 4k with my phone all the time on thru-hikes my phone would die super quick. And 3) I’d probably also run out of memory on my phone really quick.
Rode Video Microphone | 6.01 oz.
The biggest “issue” with the DJI Osmo Pocket is that the microphones are built in to the camera so it can be easy to cover them while you’re holding it if you’re not careful. The wind can also interfere with the audio quite a bit. That’s why I SOMETIMES carry this Rode Video Microphone which connects to my Sony camera. To be honest though, I mostly use this at home to record the voiceovers for my videos (and don’t take a ton of video on my sony either). If I ever get better at doing sit down interviews or vlogs (rather than talking to the camera while walking which is usually when I remember ot do it) I’ll probably use this more.
Sony A6100 | 13.97 oz.
Speaking of my Sony, I carry an A6100 while hiking and right now I have a 55-200 mm lens. I’m honestly not a HUGE camera person and way more of a hobbyist when it comse to photography so I’ll keep this pretty high level. The Sony a6100 is a mirrorless DSLR which marks it lighter than it’s mirrored counterparts, but the DSLR aspect CAN make it heavier. If you are just looking for something besides your phone camera it might not make sense to go with a DSLR (which basically means you can change the lenses).
As I said I have a 55-200 mm lens on it right now, which is quite frankly way too big and too cropped for what I typically want, but it came as a package deal with the camera and I accidentally dented the kit lens so that’s what I’m carrying until I can upgrade. Once I save enough, I’ll probably do a 24-70mm so I still have some zoom capability but not everything is so cropped.
Another note about the sony a6100, is that it’s not weather sealed. If I were going to do it over, I would fork out the extra cash for a weather sealed camera. I took this to a camera shop in West Yellowstone on the CDT to get cleaned and I think I nearly gave the guy a heart attack over the state of my sensor.
Peak Design Camera Clip | 3 oz.
Honestly, without my peak design camera clip, my camera would literally just be extra weight. This is a total game changer for actually USING my camera. To be totally transparent, I’m still learning a lot when it comes to photography so if my camera isn’t easily accessible, I’ll justify just whipping out my phone camera instead.
This clip seems to be the standard and it’s worked really well for me and I’ve never had any issues.
There is one issues to be aware of that are more about your camera and pack than the clip — it can become painful if your setup is off. On my new pack I can put the clip through the top strap so that the clip doesn’t rest directly on my shoulder and that’s a lot more comfortable than putting the clip all the way around the strap where the metal is directly on my shoulder.
With my old pack, I had to put the clip directly on my shoulder and with how big my 55-200 mm lens is, it caused quite a bit of soreness over time.
microSD (for DIJI) w/4K capabilities & SD (for Sony)
I don’t really have any strong preferences when it comes to SD cards other than I prefer to have them be as large as possible and I always try to carry a backup. Also don’t forget to make sure they are 4K compatible.
Joby Tripod | 2.56 oz.
This little Joby tripod is another piece of gear that has been with me since the PCT. It’s finally starting to wear out and needs to be replaced, but it’s still totally usable. I recommend this even and maybe especially if you are just shooting with an iphone. It’s super handy and is responsible for most of my solo selfies on trail.
I like that the legs are adjustable. I prefer this style to the straight legged options because it’s a lot more versatile with where you can place it and if you can get it set up right you can even wrap it around a trekking pole to make an extended tripod.

KITCHEN:
Backpacking gear review: Kitchen & Bear Safety!
Stove: Soto Windmaster | 3.1 oz (with 4 prong) 2.3 oz. with triflex
First up is my backpacking stove which is new to me this year. This spring I switched to the Soto Windmaster after having a few other stoves break on me and I’ve been very happy with it! Shoutout to the people who recommended it after watching my last gear video.
It’s really light at just 3.1 oz. and you can make it even lighter by ordering the 3 triflex pot support to replace the 4 prong support it comes with. I haven’t done this yet but I plan to in the future because it saves almost an ounce and my old stove was a triflex support so I’m not too worried about my put falling.
I also like that this stove has a built-in starter. I still bring a lighter just in case but I think that’s a really nice extra feature to have considering this is still so light.
The setup of this stove is a little weird and I do feel like the arms of the support take some getting used to because they fling around so easily, but they stay solidly in place once they are open with a pot on them, it’s really just kind of annoying when packing it up, etc.
It doesn’t have a windscreen but still seems to boil really quickly even in pretty windy conditions.
Overall I’m happy with this change and will be sticking with this stove for the foreseeable future!
Pot: 700 mL Toaks Titanium | 3.2 oz.
Next is my Toaks Titanium 700 mL pot. I switched to this pot before the CDT because I wanted a smaller, lighter pot that could still fit all the things I wanted to cook and this has fit the bill. My biggest question when switching to this smaller pot was will a 700 ml pot still be able to fit an entire box of mac and cheese? And yes, yes it does. I won’t deny that it’s a tight fit and boiling is an art but it’s absolutely possible.
I like the more squat version over the tall 700 ml pots because I think it makes it easier to cook and eat out of. It also makes it so you can still store your fuel can inside whereas that’s not possible with the skinny, tall ones. It does also fit a large fuel canister inside but that makes the lid pop up a bit, but I usually use the small ones anyway.
Other than that, it’s a pretty standard titanium pot coming in at 3.2 oz. and I think the only reason I’d replace it is if I got a light pot with cool features, something like the vargo bot, for example.
Spork: Sea to Summit Titanium Long Handle | .65 oz.
I like having a long handle spork so I’m ready for any kind of eating situation (these are really handy if you’re making the cook in bag backpacking meals). This sea to summit titanium spoon is also super light and durable. You’re either a spork person or your’e not and I’m a spork person. I think the prongs are helpful sometimes when you’re digging at the bottom of a tuna packet or meal and need to get those last little bits of food that a spoon can’t scoop.
Filter: Sawyer Squeeze | 3 oz.
My water filter, the sawyer squeeze, is another piece of gear that has remained constant throughout my backpacking career to date. I’ve tried a few others but I’m still a homer for Sawyer. When treated properly, these filters can last a REALLY long time and you shouldn’t have to replace them (unless they freeze).
If you find your sawyer flow is a bit slow, they have several blogs for cleaning methods that work wonders (in addition to routine backflushing).
Personally, I soaked mine in vinegar on the CDT and it made a HUGE difference in flow rate.
Another tip I like to share about the Sawyer’s is picking up one of their little coupling tools in addition to the plunger. They are super cheap and can really come in clutch if you ever have access to a hose. You just attach the hose to one side and your filter to the other and it’s a super easy and efficient way to backflush your filter. Don’t forget to tap the filter to loosen any of the dirt that’s inside as well, and you’re set!
Ursack | 7.6 oz.
Aluminum Liner for Ursack | 10.8 oz.
My Ursack and aluminum liner piece were new additions this year in order to be compliant with Rocky Mountain National Park regulations, but now that I have one, I have and will continue to bring it on many more trips.
An Ursack with a liner can definitely be redundant if you already have a bear can, like I do, but I’ve officially embraced this purchase for a few reasons:
It provides great peace of mind from not just bears but also the little critters like mice and chipmunks that tend to frequent popular campsites.
Bear hangs are a pain in the butt and bear cans are heavy, this is a great happy medium that is convenient and not AS heavy as a bear can.
Some places that require hard sided bear canisters will accept an Ursack WITH a liner (having the aluminum liner, which you have to purchase separately is key here). Since RMNP is one of those places and we were going to be doing some pretty strenuous stuff (and some scrambling) on the Pfiffner Traverse, I was super happy to have the less heavy, less bulky Ursack instead of lugging around my bear can.
Note: some places with hard sided requirements will not accept the Urscak + Liner and you still need an actual can so please check before you go!
Zpacks NlyoPro Odor Bag | .88 oz. & SWD Stuff Sack (or any DCF Bag) | 1.5 oz. each
Ever since finding the Nylopro Odor Bags from Zpacks I always add one as a liner for my food bag because it’s so easy and adds a little extra scent protection. I use it with my Ursack and with my regular food bag. I like these better than Opsaks because they’re much easier to move around and fit inside of another food bag. I also have found that over time Opsaks closures tend to go bad and so with this you don’t have to worry about a closure at all.
I don’t know how much it ACTUALLY helps with scent protection but I’ve never had any issues with little or big critters when I’ve used one. And it helps me sleep a little better at night.
Bear Rope | 2.4 oz. & Rock Bag (any small, tough bag) | 1 oz.
When I’m not bringing an Ursack or bear can in bear country, I always bring a bear rope and rock bag. It’s very important to know how to do a proper bear hang and know that there will be trees that can support one if this is your only method of bear protection.
One of the reasons I think I’ll be almost exclusively bringing an Ursack from now on is because of all the nights on the CDT I spent 20-30 minutes walking around camp just looking for a good enough tree to do a bear hang.
I imagine it’s easier to find good ones out east, but out west when it’s a lot of evergreen trees it can be pretty difficult sometimes.
As far as the bear rope and bag I use, I’d recommend something that’s easy to see at night and in early mornings and is long and strong enough to support your food bag (like the one I linked below). For a rock bag, basically any small, durable, lightweight bag is great. I do think having a rock bag is a lot easier than trying to tie a rock to your rope and totally worth the negligible amount of weight.
TOILETRIES:
Mini bamboo brush | 1.27 oz.
This mini bamboo brush is another essential that has been on pretty much every hike with me since the PCT. I prefer it to a comb because I just find it easier to use, it’s super cheap and super light. And obviously incredibly durable considering how many nights and mornings I’ve forced it through some pretty unruly windblown hair.
UL Toothbrush | .1 oz.
Instead of cutting my toothbrush I got this silly, 0.1 oz. UL one since I was ordering a few other things on Litesmith and I actually like it quite a lot. It’s not as gross to me as using the thumbprint ones since it still has a bit of a handle, and it comes with a little protector cap which is nice for storing. Honestly though, any travel toothbrush works great, as long as you’re brushing your teeth, I wouldn’t sweat this decision too much.
Travel Tooth Paste | 0.85 oz.
Similarly, I just use whatever travel toothpaste I have on hand. Usually, I do a bigger order in the spring and that lasts all summer. If I run out or I’m on trail, I just hit up the travel section in any grocery store.
Hand Sanitizer | 1 oz.
Hand sanitizer is an essential part of any backpacking toiletry kit. Personally, I like to get the small, travel hand sanitizers that come with the little carriers so I can attach it to the outside of my pack for easy access. I usually just refill these in town wherever I can find a larger container of hand sanitizer.
Zpacks Trowel | .81 oz.
I really like my Zpacks trowel, I find it to be sturdier than the deuce of spades I originally had and it’s still holding up well after digging many a cat hole.
Baby Wipes | consumable
Personally, I have not yet become comfortable enough to use a backcountry bidet, so until that day comes, I will continue to be a champion for bringing baby wipes into the backcountry. I realize they’re a bit heavier but it’s totally worth it to me to actually feel clean after wiping and I can also use any extras to wipe sweat and dirt off the rest of my body after a long day.
Usually, I’ll try to split a pack with someone because it’s hard to find smaller packs and I don’t want to carry 50 wipes.
I don’t have a brand preference, but I do tend to seek out the kind that come with the plastic snap closures rather than the sticker closures because that way I can use the packaging they come in and it’s easily resealable.
OB Organic Tampons | consumable
For the people with periods watching, I wanted to share my favorite tampons for backpacking. I know that sounds weird, but hear me out.
I’ve tried a cup and it just doesn’t work for me personally (yet), so in order to reduce my trash as much as possible while backpacking on my period, I use these OB organic tampons. They don’t come with an applicator which means I don’t have to carry out an applicator which I personally prefer.
If you want a video that goes a little more in depth on how to deal with periods in the backcountry leave a comment to let me know!
Sun Screen | 3 oz OR | 1 oz
For sunscreen, I usually just use the 3 oz. banana boat sport sunscreen. I prefer the malleable plastic because it’s lighter and that’s also why I like the 3 oz. size. It’s a little nice than carrying around a huge tube. Ultimately, I don’t really care what brand it is as long as it’s at least SPF 30 and comes in a smaller, plastic tube.
I sometimes also get the 1 oz. containers to keep easily accessible in my fanny pack without taking up too much space. I find this makes it much more likely that I’ll put sunscreen on throughout the day because I can do it while walking instead of having to stop and dig through my pack.
Bug Spray: Sawyer Picaridin 3 oz.
For bug spray, I have tried to move away from deet because not only is it terrible for you, it’s definitely melted through the plastic and gotten on gear and it’s really just a huge mess.
I’ve started using Sawyer Picaridin instead and I love it. It works a lot better than some of the “natural” bug sprays and is a lot better for you than deet. It also won’t melt your gear.
The one major difference I notice between this and deet is that you have to reapply a bit more often and it only seems to work exactly where you spread it. For example, I could sometimes get away with just a few squirts of deet and bugs would just stop coming near me at all. With this I have to make sure any exposed skin is covered, but I definitely prefer that to using deet.

FIRST AID:
I’ve paired my first aid kit down quite a lot over the years as I’ve gotten more comfortable in the backcountry and realized there is no scenario where I’ll need 30 bandaids in all different sizes. I’m not a big fan of having a giant first aid kit. The way I see it is I should have what it takes to get me by safely, but if something more serious happens than what I can handle with some ingenuity and my first aid kit, I probably need outside help anyway. Basically, I want to pack for a little for a wide range of scenarios and not over pack a bunch of random stuff for extremely unlikely what if’s. Everyone is different though and this really comes down to personal preference and your skill level (and also how remote you’ll be).
With that preface out of the way, here’s what my typical backpacking first aid kit looks like.
Gauze Pads | & LuekoTape (Small Leukotape rolls)
I always carry gauze pads and luekotape to make DIY bandaids. I find this to be a lot more versatile than trying to carry a bunch of different bandaid sizes and would probably work better for a deeper wound.
It’s also great for covering blisters in weird spots where a bandaid might typically rub off.
Two words of caution around luekotape though…
Be very careful not to put the leukotape over any weakened skin (like a blister) it is VERY strong and can definitely rip that skin right open if you try to pull it off. For the same reason, I recommend not trying to take leukotape off for a few days once it’s on. Let the bonds weaken a bit before you try to remove it. What makes it great (it’s adhesive strength) is also what makes it dangerous.
Leuko tape can also be hard to carry and store while backpacking,if you carry a whole roll it’s pretty big and bulky and probably way more than you need, butIi’ve found undoing the role and rewrapping it significantly takes away from it’s adhesive strength. I recommend looking for smaller roles, like the 0.5 yd mini roll from lite smith. It can also ooze it’s adhesiveness if it’s smashed so try to protect it in your pack if you can.
2-3 bandaids
While I typically just use luekotape and gauze I do like to have a very small amount of bandaids on hand for quick, small cuts or blisters in places that aren’t as at risk of the bandaid rubbing off. I prefer ones with adhesive all around the gauze part so dirt can’t get in.
Mini Antibiotic Ointment & Alcohol Wipes
I also like to carry mini antibiotic ointments and alcohol wipes to keep any open cuts clean. If I was going to just bring one it would be the alcohol wipes to clean the cut or scrape when it first happens before bandaging it.
Bag O’ Pills:
No thru-hiker first aid kit is complete without the bag o’ pills. I am not a medical professional so please talk to a doctor before taking any over the counter medicines but this is what I personally bring in my backpacking first aid kit. I personally prefer to avoid any gel pills because I fear how they will do in the elements and in the confined, squished space of my pack.
Ibuprofen
Sometimes fondly referred to as vitamin I by backpackers, I always bring Ibuprofen in case some unmanageable aches and pains show up. I also will sometimes take it at night after a particularly intense day to try and help with inflammation and sleep if my feet won’t stop throbbing.
Turmeric
In an attempt to not be overly reliant on the ol’ vitamin I, I have also recently started bringing turmeric pills with me. They’re a lot easier on your kidneys and also help to reduce inflammation.
Benadryl
I usually also bring a couple capsules of benadryl. Benadryl can be a great multi-purpose pill to have in case of a minor allergic reaction or if I need some help falling asleep. I like the kind that come in the little foil pack because it makes them easy to keep separate and pack in my first aid kit.
Aspirin
I always carry 1-2 aspirin just in case I somehow come across someone having a heart attack in the backcountry and it can also be used for fever or headaches.
Imodium
The last pill I always include in my lineup is imodium. So far I have been blessed by the backpacking gods and never needed to use it, but I have given it to others when their number 2s turned liquid multiple days from town.
If you don’t know, imodium is an anti-diarrheal which can be very helpful if you get giardia or food poisoning or a stomach bug while in the backcountry.
Aquaphor
The final, most essential piece of my first aid/hygiene kit (this kind of falls under both) is AQUAPHOR. I love this stuff and mostly use it as chapstick, but it can also be used as moisturizer on any particularly dry spots and some people even use it to prevent chafing.
GEAR REPAIR/BACKUP:
There’s some overlap in the first aid and gear repair category (like leuko tape can be used for blisters AND as a gear repair item and I need the scissors on my mini swiss army knife both ways). But these are some of the extra things I carry specifically for gear repair.
Mini Swiss Army Knife | .7 oz.
So like I said I also use my mini swiss army knife to cut luekotape to put over blisters and cuts but it’s also essential for cutting patches and gear repair tape.
I also use the little knife occasionally for food and the little tweezers have come in handy for some first aid situations as well.
Tenacious Tape
Tenacious tape is one of my favorite gear repair tapes. It’s super versatile and can be used on pretty much any piece of gear from your sleeping bag to your tent. You just cut it up into small patches (or buy it that way), clean the area that needs to be fixed, and put it on for a great little field repair.
Pad Repair Kit
I like to also carry a field repair kit for my blow up pad. Therm-a-rest makes one and most blow up pads will come with one. Luckily, I haven’t had to use this yet but have helped friends use theirs and carrying this is so much better than spending several nights sleeping directly on the ground.
Sawyer Plunger/Coupler | .02 kg
I talked a bit about the Sawyer coupler in my backpacking gear review of all my kitchen things but a quick reiteration: the couple allows you to backflush using a hose and it’s super tiny and light. If you’re like me and don’t always want to carry the plunger, this is a good alternative.
That said, carrying the Sawyer plunger is a great way to make sure your filter keeps flowing well for a long time and can be really helpful when you have no choice but to fill up from silty or nasty water sources.
Extra O ring | 0.01 kg
I also always carry an extra O ring for my water filter. They weigh basically nothing and can really come in handy if you happen to lose the one that comes with your filter. They can occasionally fall out when you are screwing and unscrewing the filter from your water bottle and you don’t always notice right away. If you don’t have it, the dirty water can leak out of the filter while you’re filtering which is obviously no bueno.
Aquatabs
I ALWAYS have aquatabs as a backup water treatment option. If I accidentally leave my filter out overnight and it freezes or if I have to gather some particularly NASTY water, I really appreciate the peace of mind of having a backup water treatment option.
Sometimes after a long day it’s also nice to just collect water and not filter. So I’ll occasionally use aquatabs to treat my water instead of filtering when I’m feeling particularly lazy.
You just put two tabs in 1 liter and wait 30 minutes and you’re good to go. It can give the water a slight chlorine-y taste but it’s not very strong.
Needle & Thread
A very basic but necessary addition to any gear repair kit, a simple needle and thread. I usually just use a travel sewing kit. They tend to pop up in random places like hotels and I just keep them for backpacking. The kit I linked is very similar to the one I carry but it comes with 20 (I couldn’t find any smaller options) so maybe split it with some friends or bless a local hiker box.
Map & Compass | 1.62 oz.
Finally, I consider a map & compass to be gear backup for my phone if it ever were to break. Like most people, my phone is my primary navigation tool in the backcountry but especially now that I’m doing more off trail stuff a map and compass are essential pieces of gear that I think everyone should carry and know how to use.
I linked the compass that was recommended to me at the navigation course I took and I usually just put whatever map I’m using in a gallon ziploc bag to keep it safe from the elements.

SOMETIMES GEAR:
Finally, there is gear I carry for certain situations but not all the time that I wanted to include but wasn’t sure where. So here we have the “sometimes gear” category.
Microspikes | 11 oz. Amazon OR Kahtoola
First up, is microspikes. I’ve used cheap amazon ones for years, but I can’t find the exact ones anymore so I wanted to also link the Kahtoola ones I borrow from Josh very regularly since I know they are reliable.
Regardless of which brand and price point you choose, mirco spikes are an essential piece of gear for me in icy and hard packed snow. This is especially prevalent with late season snow that has melted and refrozen a bunch or trails that are extremely packed during winter.
Microspikes have saved me from countless falls and allowed me to go much faster in icy areas than I otherwise would be able.
Camp Corsa Ice Axe | 7.2 oz.
Another piece of snow/ice gear that can be essential in certain situations is my Camp Corsa Ice Axe. This is a lightweight ice axe that you can use to self-arrest if you every find yourself sliding down a snowy slope on a backpacking trip.
I definitely recommend practicing self-arresting beforehand and potentially even taking some snow safety classes if you know you’ll be backpacking over steep snow.
Sun Umbrella | 6.3 oz.
One of my all time favorite pieces of supplemental backpacking gear is my sun umbrella! I swear hiking under this thing makes it feel 10-15 degrees cooler which is an absolute game changer when desert hiking. It also provides shade in areas where there is none to be found (looking at you, New Mexico on the CDT).
As someone who is prone to heat rash, this makes a big difference with sun protection and cna also be great in the rain too.
Bear Spray | 7.9 oz.
Finally, I do carry bear spray any time I’m hiking in grizzly country. I personally prefer the kind that comes with a holster so I can attach it to my fanny pack and make it easily accessible while hiking.

WOWZA! If you made it all the way here, THANKS SO MUCH FOR READING! This my most comprehensive backpacking gear list I’ve compiled to date. I really hope you found it helpful.